Thursday, February 27, 2014

Vol Move Command in Netapp

Today i have faced a situation where i need to increase a size of a volume but i don't have enough space in that particular aggregate all that i can do now is move volume to another aggregate which is having enough space and then increase the volume size.

please remember these handful condition while performing the vol move 


Before you move a volume nondisruptively, you must be aware of the type of volumes you can move and the operations that might conflict with the volume move. The volume move does not start if the volume has unsupported settings or if there are conflicting operations.

  • Your FAS system or V-Series system must be running Data ONTAP 8.0.1 7-Mode or later.
  • You can move only one 7-Mode FlexVol volume at a time.
  • The volume must be online.
  • You cannot move the following types of volumes:
    • A root volume
    • A FlexClone volume
    • A FlexCache volume
    • A volume that is the destination of any replication relationship, such as volume SnapMirror or qtree SnapMirror
    • A volume that is a SnapVault destination
      Note: During a volume move, you must not initiate qtree SnapMirror or SnapVault relationships from the destination volume.
    • A read-only volume
    • A volume in a nondefault vFiler unit
    • A volume from a 32-bit aggregate to a 64-bit aggregate, or from a 64-bit aggregate to a 32-bit aggregate
  • The data in the volume must not be compressed using the data compression feature.
  • The source volume should not be exported to NFS or CIFS clients when the volume move operation is in progress.
    There is a small window of time when you can export the source volume over NFS or CIFS before the volume move enters the cutover phase. However, if you do so, the cutover phase might not be successfully completed. If the cutover phase is not completed, there is no disruption to SCSI clients because the volume move rolls back to continue with the data copy phase.
  • The source volume must be consistent.
  • The volume guarantee option must not be set to file.
  • Deduplication operations must not be running on the source volume.
    If deduplication is active, the volume move is paused and the cutover phase is not initiated.
    For more information about deduplication operation, see the Data ONTAP 7-Mode Storage Management Guide.
  • The following conflicting operations must not be running:
    • SnapRestore of the source volume or the containing aggregate
    • WAFLIron operation on the source or the destination aggregate
    • Active LUN clone split operations on the source volume
    • Revert operation on the storage system

We can nondisruptively move a volume from one aggregate to another within a storage system. You can continue to access data in the LUNs during the volume move.


  1. Start the volume move by entering the following command:vol move start srcvol dstaggr [-k] [-m | -r num_cutover_attempts] [-w cutover_window] [-o] [-d]
    srcvol specifies the source volume.
    dstaggr specifies the destination aggregate.
    -k retains the source volume after a successful move. The source volume remains offline.
    -m specifies that the volume move does not initiate automatic cutover. The system continuously runs updates and you can initiate manual cutover at any point during the volume move.
    num_cutover_attempts specifies the number of cutover attempts. The minimum number of cutover attempts is one and the default number of attempts is three. If cutover cannot be completed in the specified number of attempts, then the volume move is paused.
    cutover_window specifies the duration of the cutover window. The default and minimum value is 60 seconds.
    -o displays warning messages on the console and the operation continues.
    -d runs all the data copy phase checks. If any of the checks fail, error messages are displayed on the console and the operation is terminated.

Result

If the volume move is successful, the destination volume retains the following:
  • Snapshot copies of the source volume
  • Attributes of the LUNs from the source volume in the corresponding LUNs in the destination volume

Netapp Too many users logged in ! Please try again later

Too many users logged in! Please try again later. This is the wonderful greeting you get from a NetApp when another user is logged in to the console. and if they forget to logout you will be not able to login.
Today i have faced this problem and almost frustrated finally i found this on web and felt like sharing with all. In case if you are getting the above message you can use the command below form any server from which your filer is accessible.
rsh <filername> -l root:<password> logout telnet

Netapp thresholds for good performance

To Achieve better performance Please make sure your filer was under the below threshold limits               

Filer Threshold                                                                                                                             


Volume Threshold                                                                                                                      


      Protocol Latency limits


Exchange Server Thresholds                                                                                                      
                                                                               

SQL Threshold Values                                                                                                                 


      ORACLE Threshold values


Netapp Volume DataMotion Highlights

Today i have performed Netapp DataMotion for volumes to migrate volumes from One Aggregate to another aggregate and i can see DataMotion uses SNAPMIRROR in the back end to move the data from OLD VOLUME to the NEW VOLUME. Please find the brief summary below how it works...

Note :- My volumes has ORACLE DB running on them and i have seen no disruption to the application during DataMotion it went smooth and Hassle Free.

prodfiler4> vol move start production_vol_adm ataggr0 -k

prodfiler4> Wed Feb 26 16:14:50 SGT [prodfiler4:vol.move.Start:info]: Move of volume production_vol_adm to aggr ataggr0 started
Creation of volume 'ndm_dstvol_1393402490' with size 21474836480  on containing aggregate
'ataggr0' has completed.

Volume 'ndm_dstvol_1393402490' is now restricted.

Wed Feb 26 16:15:13 SGT [prodfiler4:vol.move.transferStart:info]: Baseline transfer from volume production_vol_adm to ndm_dstvol_1393402490 started.
Transfer started.

Monitor progress with 'snapmirror status' or the snapmirror log.

Wed Feb 26 16:16:54 SGT prodfiler4:vol.move.transferStatus:info]: Baseline transfer from volume production_vol_adm to ndm_dstvol_1393402490 took 97 secs and transferred 1935528 KB data.

Wed Feb 26 16:16:56 SGT [prodfiler4:vol.move.transferStart:info]: Update from volume production_vol_adm to ndm_dstvol_1393402490 started.
Transfer started.

Monitor progress with 'snapmirror status' or the snapmirror log.

Wed Feb 26 16:17:18 SGT [prodfiler4:vol.move.transferStatus:info]: Update from volume production_vol_adm to ndm_dstvol_1393402490 took 13 secs and transferred 1160 KB data.

Wed Feb 26 16:17:23 SGT [prodfiler4:vol.move.transferStart:info]: Update from volume production_vol_adm to ndm_dstvol_1393402490 started.
Transfer started.

Monitor progress with 'snapmirror status' or the snapmirror log.

Wed Feb 26 16:17:44 SGT [prodfiler4:vol.move.transferStatus:info]: Update from volume production_vol_adm to ndm_dstvol_1393402490 took 12 secs and transferred 1104 KB data.

Wed Feb 26 16:17:44 SGT [prodfiler4:vol.move.updateTimePrediction:info]: Expected time for next update from volume production_vol_adm to ndm_dstvol_1393402490 is 12 secs to transfer 272 KB data.

Wed Feb 26 16:17:52 SGT [prodfiler4:vol.move.cutoverStart:info]: Cutover started for vol move of volume production_vol_adm to aggr ataggr0.
Transfer started.

Monitor progress with 'snapmirror status' or the snapmirror log.

prodfiler4> vol move status production_vol_adm
Source                Destination                     CO Attempts    CO Time     State
production_vol_adm    ataggr0                         3              60          cutover

prodfiler4> Wed Feb 26 16:18:07 SGT [prodfiler4:vol.move.cutoverEnd:info]: Cutover finished for vol move of volume production_vol_adm to aggregate ataggr0 - time taken 14 secs

prodfiler4> vol move status production_vol_adm
Source                Destination                     CO Attempts    CO Time     State
production_vol_adm    ataggr0                         3              60          cutover

prodfiler4> Wed Feb 26 16:18:16 SGT [prodfiler4:wafl.vvol.renamed:info]: Volume 'ndm_dstvol_1393402490' renamed to 'production_vol_adm_old_1393402490'.
'ndm_dstvol_1393402490' renamed to 'production_vol_adm_old_1393402490'
Wed Feb 26 16:18:17 SGT [prodfiler4:vol.move.End:info]: Successfully completed move of volume production_vol_adm to aggr ataggr0.


I have observed one important thing during the DataMotion is that you SOURCE VOLUME should have atleast 10% of FREE_SPACE left in it if not you may face issue during cut_over time as once after the base transfer it creates a snapshot on the Source Volume and do the updates based on the snapshot if you don't have enough space to create snapshots it will just show you transferring updates for more than 5 times which means you have to abort the DataMotion and increase the SOURCE VOLUME size and then start over again.

One more Important thing is the snap autodelete commitment settings on the volume should be set to Try 

Ex:- snap autodelete production_vol_adm commitment try ( Set this before initiating DataMotion )

Security on Netapp Filers

Storage systems usually store data critical for organization like databases, mailboxes, employee files, etc. Typically you don’t provide access to NAS from Internet. If Filer has real IP address to provide CIFS or NFS access inside organization you can just close all incoming connections from outside world on frontier firewall. But what if networking engineer mess up firewall configuration? If you don’t take even simple security measures then all your organization data is at risk.
Here I’d like to describe basic means to secure NetApp Filer:
  • Disable rsh:
options rsh.enable off
  • Disable telnet:
options telnet.enable off
  • Restrict SSH access to particular IP addresses. Take into consideration that if you enabled AD authentication Administrator user and Administrators group will implicitly have access to ssh.
options ssh.access host=ip_address_1,ip_address_2
  • You can configure Filer to allow files access via HTTP protocol. If you don’t have HTTP license or you don’t use HTTP then disable it:
options http.enable off
  • Even if you don’t have HTTP license you can access NetApp FilerView web interface to manage Filer. You can access it via SSL or plain connection, apparently SSL is more secure:
options http.admin.enable off
options http.admin.ssl.enable on
  • Restrict access to FilerView:
options httpd.admin.access host=ip_address_1,ip_address_2
  • If you don’t use SNMP then disable it:
options snmp.enable off
  • I’m using NDMP to backup Filer’s data. It’s done through virtual network. I restrict NDMP to work only between Filers (we have two of them) and backup server and only through particular virtual interface:
On Filer1:
options ndmpd.access “host=backup_server_ip,filer2_ip_address AND if=interface_name”
options ndmpd.preferred_interface interface_name
On Filer2:
options ndmpd.access “host=backup_server_ip,filer1_ip_address AND if=interface_name”
options ndmpd.preferred_interface interface_name
  • Disable other services you don’t use:
options snapmirror.enable off
options snapvault.enable off
  • Module which is responsible for SSH and FilerView SSL connections is called SecureAdmin. You probably won’t need to configure it since it’s enabled by default. You can verify if ssh2 and ssl connections are enabled by:
secureadmin status
  • Make sure all built-in users have strong passwords. You can list built-in users by:
 useradmin user list
  • By default Filer has home directory CIFS shares for all users. If you don’t use them, disable them by deleting:
/etc/cifs_homedir.cfg
  • Filer also has ETC$ and C$ default shares. I’d highly recommend to restrict access to these shares only to local Filer Administrator user. In fact, if you enabled AD authentication then also domain Administrator user and Administrators group will implicitly have access to these shares, even if you don’t  specify them in ACL. Delete all existing permissions and add:
cifs access share etc$ filer_system_name\Administrator Full Control
cifs access share c$ filer_system_name\Administrator Full Control
Basically this is it. Now you can say that you know hot to configure simple NetApp security.

NetApp Active/Active Cabling


Cabling for active/active NetApp cluster is defined in Active/Active Configuration Guide. It’s described in detail but may be rather confusing for beginners.
First of all we use old DATA ONTAP 7.2.3. Much has changed since it’s release, particularly in disk shelves design. If documentation says:
If your disk shelf modules have terminate switches, set the terminate switches to Off on all but the last disk shelf in loop 1, and set the terminate switch on the last disk shelf to On.
You can be pretty much confident that you won’t have any “terminate switches”. Just skip this step.
To configuration types. We have two NetApp Filers and four disk shelves – two FC and two SATA. You can connect them in several ways.
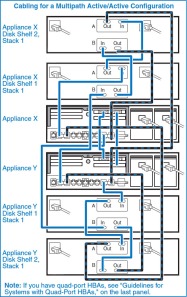
First way is making two stacks (formely loops) each will be built from shelves of the same type. Each filer will own its stack. This configuration also allows you to implement multipathing. Lets take a look at picture from NetApp flyer:

Solid blue lines show primary connection. Appliance X (AX) 0a port is connected to Appliance X Disk Shelf 1 (AXDS1) A-In port, AXDS1 A-Out port is connected to AXDS2 A-In port. This comprises first stack. Then AY 0c port is connected to AYDS1 A-In port, AYDS1 A-Out port is connected to AYDS2 A-In port. This comprises second stack. If you leave it this way you will have to fully separate stacks.
If you want to implement active/active cluster you should do the same for B channels. As you can see in the picture AX 0c port is connected to AYDS1 B-In port, AYDS1 B-Out port is connected to AYDS2 B-In port. Then AY 0a port is connected to AXDS1 B-In port, AXDS1 B-Out port is connected to AXDS2 B-In port. Now both filers are connected to both stacks and in case of one filer failure the other can takeover.
Now we have four additional free ports: A-Out and B-Out in AXDS2 and AYDS2. You can use these ports for multipathing. Connect AX 0d to AXDS2 B-Out, AYe0d to AXDS2 A-Out, AX 0b to AYDS2 A-Out and AY 0b to AXDS2 B-Out. Now if disk shelf module, connection, or host bus adapter fails there is also a redundant path.
Second way which we implemented assumes that each filer owns one FC and one SATA disk shelf. It requires four loops instead of two, because FC and SATA shelves can’t be mixed in one loop. The shortcoming of such configuration is inability to implement multipathing, because each Filer has only four ports and each of it will be used for its own loop.
This time cabling is simpler. AX 0a is connected to AXDS1 A-In, AX 0b is connected to AYDS1 A-In, AY 0a is connected to AXDS2 A-In, AY 0b is connected to AYDS2 A-In. And to implement clustering you need to connect AX 0c to AXDS2 B-In, AX 0d to AYDS2 B-In, AYe0c to AXDS1 B-In and AY 0d to AYDS1 B-In.
Also I need to mention hardware and software disk ownership. In older system ownership was defined by cable connections. Filer which had connection to shelf A-In port owned all disks in this shelf or stack if there were other shelves daisy chained to channel A. Our FAS3020 for instance already supports software ownership where you can assign any disk to any filer in cluster. It means that it doesn’t matter now which port you use for connection – A-In or B-In. You can reassign disks during configuration.

NetApp storage architecture


All of us are get used to SATA disk drives connected to our workstations and we call it storage. Some organizations has RAID arrays. RAID is one level of logical abstraction which combine several hard drives to form logical drive with greater size/reliability/speed. What would you say if I’d tell you that NetApp has following terms in its storage architecture paradigm: disk, RAID group, plex, aggregate, volume, qtree, LUN, directory, file. Lets try to understand how all this work together.
RAID in NetApp terminology is called


 RAID group. Unlike ordinary storage systems NetApp works mostly with RAID 4 and RAID-DP. Where RAID 4 has one separate disk for parity and RAID-DP has two. Don’t think that it leads to performance degradation. NetApp has very efficient implementation of these RAID levels.


Plex is collection of RAID groups and is used for RAID level mirroring. For instance if you have two disk shelves and SyncMirror license then you can create plex0 from first shelf drives and plex1 from second shelf.  This will protect you from one disk shelf failure.


Aggregate is simply a highest level of hardware abstraction in NetApp and is used to manage plexes, raid groups, etc.


Volume is a logical file system. It’s a well-known term in Windows/Linux/Unix realms and serves for the same goal. Volume may contain files, directories, qtrees and LUNs. It’s the highest level of abstraction from the logical point of view. Data in volume can be accessed by any of protocols NetApp supports: NFS, CIFS, iSCSI, FCP, WebDav, HTTP.


Qtree can contain files and directories or even LUNs and is used to put security and quota rules on contained objects with user/group granularity.


LUN is necessary to access data via block-level protocols like FCP and iSCSI. Files and directories are used with file-level protocols NFS/CIFS/WebDav/HTTP.

NetApp Cluster, HA Pair Difference and Confusion

Personally I always get confused over these terms and with the Cluster Mode of NetApp it becomes even more confusing. This post is just to clarify the basics on the terminology used.

What is a NetApp HA Pair

 An HA pair consists of 2 identical controllers; each controller actively provides data services and has redundant cabled paths to the other controller’s disk storage. If either controller is down for any planned or unplanned reason, its HA partner can take over its storage and maintain access to the data. When the downed system rejoins the cluster, the partner will give back the storage resources.


Olden day meaning of Cluster: The term cluster has been used historically to refer to an HA pair running Data ONTAP 7G or 7-Mode. But not anymore.

What is a NetApp Cluster then:

The term cluster now refers only to a configuration of one or more HA pairs running clustered Data ONTAP.


7- Mode, Cluster Mode and Clustered Data ONTAP:

There are 2 variants of NetApp ONTAP operating systems.

1) 7-mode
2) Cluster Mode or C-Mode or the new name Clustered Data ONTAP.